Friday, April 29, 2011

Look What I Made Last Night

I had a  little free time yesterday and was really itching to make something. I was going to try the next step on my sign, but I'm out of transfer paper for attaching the vinyl. And I didn't have enough time to start a big project. So this little project was perfect.

I made hanging towels for my kitchen!


These were so easy!

I used towels I picked up at the dollar store, and a couple potholders from K-Mart.

All you need to do is sew a gathering stitch down the center of the towel. I just followed the fold line. Then I pulled the bobbin thread to gather the towel until it was the size of the potholder.

Then I pinned it onto the RIGHT side of the potholder. You want to make sure you attach the towel to the side of the potholder that you want to show. (Sorry no pictures of this step)

You could take a ruler and fabric pen to mark the middle of the potholder, but I just folded and eyeballed it. It doesn't need to be an exact science.

Then sew right along your gathering stitch to attach the towel to the potholder.


Then I flipped it over and sewed the other side, just to make it stronger.

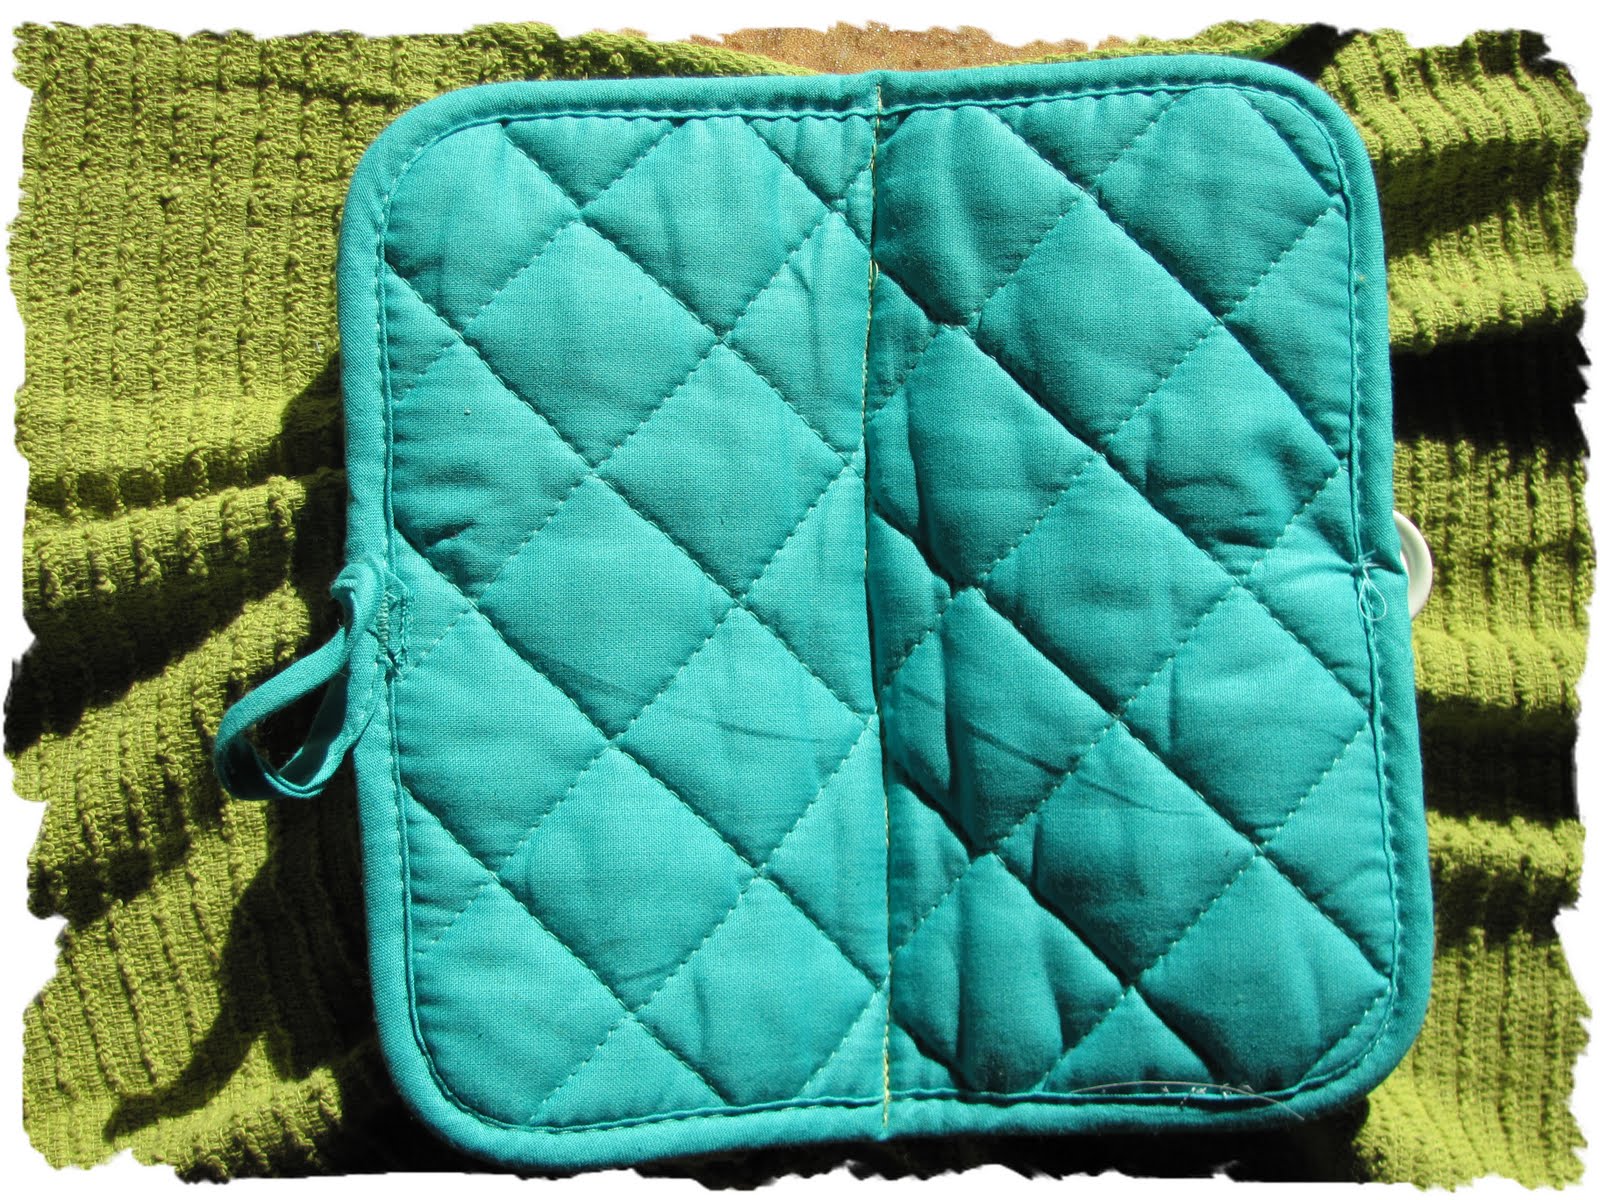
Note: Depending on your machine and the thickness of your potholder, you might want to use a heavy-duty needle when sewing through all the layers. After two broken needles, I switched to a heavy-duty needle and that worked MUCH better.

Finally, you just have to add a cute little button to the potholder. 


Pull the little hanging loop on the potholder over the button and hang your towel up on a knob or drawer pull, and you are done!

Now, with my second one, I added a little ruffle to fancy it up a little bit. You can never have too many ruffles, can you?


It was so awesome, even my little elf was impressed!

Have a good weekend!

Until next time,

Megan

I linked up at: 
Photobucket

Tuesday, April 26, 2011

Craft-astrophes: A Work in Progress

Source: Jaymann on Etsy
A few weeks ago, I spotted this sign on Pinterest. Isn't it awesome? It just oozes awesomeness. It's based on a quote from Neil Patrick Harris's character on "How I Met Your Mother." I've only recently started watching the show. I don't know what took me so long to get on board with it. I'm loving it. And I'm loving this quote. It's a good reminder that we can choose our attitudes. There are days when I need that reminder. So I needed this sign. I set out to make one.

I figured I'd just cut the vinyl, stick it onto canvas, spray paint it, remove the vinyl, and be done with it. Easy peasy. 

Not.

At least not for me. Two tries later, I'm at a bit of a loss. I'm hoping somebody somewhere out there in crafty blogland will give me a few tips.

First of all, it took forever to figure out how to get my Silhouette to cut the right size. I won't bore you with the details of how I figured it out. (Partly because I'm not exactly sure myself--there was a great deal of dumb luck involved.)

Anyway, I finally got the vinyl cut. I had to cut it in two sections, breaking up the quote to three lines each (does that make sense?). No biggie. Except I was too impatient when I transferred the vinyl to the canvas. Silly me thought I could just eyeball it and make it straight. Ummm, no. So the first three lines were a big crooked. I tried cutting the last three lines apart, and I got out my ruler, so those ended up being a little less crooked.

But the vinyl didn't want to stick to the canvas. I rubbed and I rubbed. I finally thought I had it good enough, and I set out to spray paint it. That's when all hell broke loose. The spray paint made the vinyl lift up off the canvas. It was a mess. Then I panicked and tried taking the letters off before the paint dried. That made me mess up some of the paint. After letting everything dry overnight, I did go back and try to touch up the letters with some white acrylic paint, but I don't have a very steady hand.
This is attempt #1.


A close-up of attempt #1, after I tried to retouch it. Note the messed-up background paint.
Well, if at first you don't succeed, try again, right? For my second attempt, I switched to a canvas board instead of a wrapped canvas. I figured that would give me more leverage to rub the vinyl onto the canvas. It seemed to be working. And even after I thought I had the vinyl stuck on as well as it could stick, I went back and rubbed it some more. Then I went to spray paint it, making sure to do really light coats. But the same thing happened. I wish I had thought to take a picture of how the vinyl curled up from the spray paint, but at that time I was just too frustrated to think of that.

Attempt #2

A close-up of #2. I haven't tried retouching it yet.


So here's what I'm thinking:
  • Maybe I should switch to the premium vinyl. I'm hesitant to do that because it is twice as expensive, but I believe it has stronger adhesive qualities. 
  • Or, maybe I need to paint the canvas white first. Maybe a coat of paint would give the vinyl something to stick to.
  • Or maybe I need to switch to a piece of plywood instead of canvas. But I know I've seen projects using vinyl on canvas, haven't I?
  • Or maybe all of the above.
Any thoughts on what I should try next? I really want to make this sign! It doesn't have to be perfect, just better than what I've gotten so far.


I'll keep you posted on how the next attempt goes. So I guess we can say this post is TO BE CONTINUED.....

I linked up at:


Monday, April 25, 2011

Hoppy Easter, Everyone!


Hoppy Easter!
I hope you all had a blessed Easter. The weather here turned gorgeous just in time to enjoy the glorious day. We started our day with an egg hunt in our basement.

Then we went to my in-laws for lunch. While we waited for the food to finish cooking, we had another egg hunt in their back yard.


 Eliza was really more interested in her book, however.

I made these yummy bird nest treats to share. Thanks to Our Adventures in Home Improvement for the recipe.


They turned out so cute and they were so simple. These may become an Easter tradition!

Until next time,

Megan

Thursday, April 21, 2011

Mmmm.... Chocolate Bunny Pillow

I had some unexpected free time the other day. My dad took the baby to the indoor park for a few hours. (Thanks, Dad!) I should have used the time to take a nap, but instead I decided to make something. Now that I finished my nieces' dresses, I can go back to working on my own sewing projects. I've also been dying to try out the Silhouette fabric interfacing. Plus, I'm running out of time to make Easter projects. So I made this little pillow.

I didn't take step-by-step photos or anything, because 1) my sewing area is a DIS-AS-TER, and 2) I was trying to cram as much sewing time into my break as I possibly could, and I didn't know when my dad would be back with Eliza. 

Like I mentioned, I used the Silhouette fabric interfacing. This stuff allows you to cut fabric with the Silhouette cutter. AWESOME! You just iron it onto your fabric, choose your design on your Silhouette, feed the fabric through the cutter, then iron the shape onto the background fabric. Easy! I added a little yellow ribbon and a white button for the eye.
 
I sewed up the pillow cover and stuck it on the pillow form. All done! I could just eat him up!


Until next time,

Megan

I linked up at Somewhat Simple: Strut Your Stuff Blog Link Party
and  
UndertheTableandDreaming

I Finished It!

Some time last fall, I promised my sister that I'd make matching dresses for my nieces. She bought the fabric, and it went into my "to do" pile. Then Christmas came, and I got carried away with making tons of gifts. Then there was Valentine's day, and I got carried away with making decorations. And then there was spring, and, well, you've seen what I've been up to. So the fabric was sitting there, making me feel guilty every time I saw it. 

And the thing is, the pattern I use is so simple. It only takes about 1 1/2 hours to make a dress. I've made several for Eliza. It's the Sweet Dress pattern from Leila and Ben. You can find it here: http://leilaandben.com/sweetdress.htm I highly recommend the pattern. It is very versatile. There are so many little tweaks you can do to change it up. I have the baby size and the 12 month - 5T. And word on the street has it that they will soon be coming out with a pattern for even bigger sizes, sizes 6-10.

A few months ago, I finally got around to making the dress for my youngest niece, Ruby (age 2). I also cut the fabric for my oldest niece, Cora (age 4). But then I got distracted again. That happens a lot. So finally, last week, I sat down and finished Cora's dress too.

For both dresses, I followed the pattern exactly. I didn't add anything extra, but I like the simplicity of the dress. Plus, I didn't want to make my sister wait any longer while I putzed around with ruffles or whatever. So here is the picture of Cora's finished dress. I already gave Ruby's dress to my sister, so I don't have a picture of it. But it is exactly the same, only smaller.

Cute, ain't it? I can't wait to see them in their matching dresses. Hopefully my sister will take a picture. Who am I kidding? My sister is a photographer. Of course she'll take a picture.

Until next time, 

Megan

Tuesday, April 19, 2011

My Spring "Mantel," Part Dos

So, I promised I'd share the rest of my mantel, er--piano, display. There isn't really that much to show you that you haven't already seen. Bookpage eggs, some nests, stuff like that. I have a few ceramic bunnies I picked up at thrift stores and/or garage sales. The white frame is from Ikea, and I cut the bunny shape out from scrapbook paper with my Silhouette. I like to change out my Scrabble letters for different seasons. Besides looking cute, it gives my family a creative outlet. They like to see how they can rearrange the letters to make new words. Today, my dad babysat while I went to an appointment, and I came home to "FERSHER." He probably thought I wouldn't notice.

The tree is just a branch with some faux flowers (from the Dollar Tree) hot-glued onto it, the same way I did the branch on my front door wreath. And I shared that little moss nest earlier. I just love it, don't you?


That's all, kiddos. 
Until next time,

Megan
p.s. I'm gonna have another printable ready for you soon. It's totally awesome!

Monday, April 18, 2011

How Sweet It Is

Hi there!

So I mentioned last week that I had a "sweet" project to share with y'all, and here it is.

We like candy in this house. We usually have a supply. Since October, our candy jar has looked like this:
Seriously. Something had to be done. It was out of control. (And yes, that is a bag of candy corn. Yes, from Halloween. It's unopened.) I couldn't take it anymore, so I finally did something about it.

At Target, I found a glass jar for $8. I didn't take a before picture of it because I forgot. I just rushed headlong into the project. I'm still getting used to this blogging thing and remembering to take pictures of every. single. step. But I'm sure that you are intelligent enough to look at the finished picture and imagine what it looked like before. 

I designed the word art on my Silhouette software. My Silhouette rocks. Just sayin'. Then I cut the design out of some vinyl. I used the regular vinyl (not the premium). My Hobby Lobby carries a VERY small selection of colors of non-premium Silhouette vinyl. I am not a huge fan of this color, so I use it for things like stenciling and glass etching.


Once I had my design cut, I removed the insides of the letters because I was using it as a stencil. I secured the vinyl to my jar, like this:
Next came a heavy coat of Armour Etch. I like to just pile it on as thickly as I can. Normally I'd use a little more than this, but I'm starting to run low.
I also leave it on for a little longer. The bottle says to leave it on for about 5 minutes. I like to wait about 10. I don't know if that's really necessary, but it makes me feel like I have a better chance of getting a good result.
After that, I just rinsed off the Armour Etch, removed my stencil, and VOILA! My brand-new candy jar.
It's really hard to take a decent picture of etched glass. Especially one that doesn't show all the little fingerprints. Oh well. Keepin' it real, I guess.


Aah, that's much better. Bye-bye, cheap plastic cauldron. I'll see you in October.

Until next time, 

Megan

Thursday, April 14, 2011

Things I've Said This Week

  • "Honey, would you please stop hitting me with your shoe."
  • "No, Sweetie, we don't put Froot Loops in our ears."
  • "You have toilet paper in your hair!"
  • "Stop eating the bed!" 
  • "Get out of the garbage!" (Oh, if I had a nickel for every time I have said that...)
  • "You've got a Cheeto in your eyelash."
  • "Baby, get out of the dishwasher, please." 
  • "Why is there macaroni up your sleeve?" And I said that to the 6-year-old, not the baby.
  • "I'm just getting your poopy diaper off the roof."*

*Yes, I really said that.

What's This? A Printable!


I am not a graphic designer, but I like to play one on my computer. From time to time, I plan to share some printables with you. Feel free to download for personal use

This quote is hanging on my wall above my piano, surrounded by family photos. It's a good reminder.

I've never tried posting things for other people to download, so I hope this works. It should be an 8x10 jpg at 300 dpi. If it doesn't work, let me know.

I hope you enjoy it.

Click here to download: OtherThings printable 8x10

Until next time,

Megan

My Spring "Mantel," Part One


I don't have a mantel. I wish I did. I dream that some day I will live in a house with a mantel. And a turret. And a claw-foot tub. And... Oops, I guess I kind of got off-track there. What was I talking about? Oh yeah, mantels. So instead of a mantel, I use my piano as a stand-in. It does the trick. Today, I'm going to share some of my mantel decor with you.

Remember how much I love birds? They're so perfect for spring. I picked up a couple dollar store birds. I didn't take before pictures (again, I made these pre-blog), but they were "realistically" painted. I covered them with several coats of antique white spray paint. I bought their nests from Hobby Lobby and perched them atop glass candlesticks from the dollar store and thrift stores. 

Next, I made them a little house. The unfinished birdhouse was only a dollar at Joann's. I Mod-Podged colored photocopies of sheet music onto it. The sheet music is for "The Whiffenpoof Song." It was one of my grandfather's favorite songs, and my dad used to sing it to me when I was little. Now I sing it to my kiddos.


Finally, I found these two little birds at the flea market, and the wire bird cage is actually a candle holder I picked up at a garage sale. I stick a little grapevine wreath inside for a nest. My son thinks I should close the door on the bird cage, but I like leaving it open so that the little birdie is free to fly.


 So that is the left side of my mantel display. Stay tuned for the right side! 

Oh, and I have a "sweet" project I finished last night. Just need to get some decent pictures of it, then I'll share that with you too!

Until next time,

Megan


Tuesday, April 12, 2011

Fabulous Giveaway

Please check out the Images Everlasting website for a fabulous giveaway. The lovely and talented Rebekah, who also happens to be my sister, has some awesome prizes. Lots of ways to win, too!


I'm going to try to be back later with another post, if the baby lets me. Right now we're having a book-reading marathon. I'm about to read A Visit to the Zoo for the 8th time. She likes the picture of the foxes.

Until next time,

Megan

Monday, April 11, 2011

Book Page Eggs


Hi! Did you have a good weekend? I sure did. I didn't do anything too exciting, but sometimes those are the best kinds of weekends.

Today I just have a quick post to share my book page eggs. I just used cheap plastic eggs and Mod-Podged strips of pages that I cut out of a book. It was a little messy, but honestly, the hardest part of making these was getting up the nerve to intentionally cause damage to a perfectly good book. 

I'll be back soon with some more spring and Easter decor.

Have a great Monday!

Until next time,

Megan
 

Friday, April 8, 2011

Nesting Instincts

 “When I learn something new - and it happens every day - I feel a little more at home in this universe, a little more comfortable in the nest.”
--Bill Moyers

You might say I have a little thing for birds. Okay, it's kind of a big thing. Lately, I can't resist them. And every bird needs a nest, right? So I've been making nests. I shared how I made the jute nests in this post. But I thought I'd share how I used them. 

This little guy is perched in my living room. Ain't he purty? I found him at a thrift store. I made the eggs following this tutorial at V and Co. I couldn't for the life of me get the fabric as smooth as she did, but I still like them.

Then I stuck another nest into this wooden bowl a friend of mine gave to me years ago from the Philippines. I added a few more fabric covered eggs. Then when I was at the thrift store other day, I spotted this little wooden bird. Perfect, don't you think?


The jute nexts are nifty, but then I decided I wanted something a little more realistic looking. So I got out my trusty Mod Podge and my bag of Spanish moss from the dollar store. I just wanted some small nests, so I used the bottom half of a plastic Easter egg as the form. I covered it with plastic wrap and started dipping the moss in the Mod Podge and sticking it to the plastic-wrapped egg. What. A. Mess. It was really hard to get the moss to stick to the egg. So I took another sheet of plastic wrap and placed it over the top of it all, then I put a slightly large egg on top so it would hold the shape. (Sorry, no pictures. For one thing, I hadn't started this blog yet, and for another thing, I would have gotten Mod Podge and moss all over my camera. Did I mention it was messy?) After it had set up a little bit, I was able to remove the top egg so that everything could dry. I left it overnight and into the next day. When it was finally dry, I lifted it off the plastic egg on the bottom and had myself a little nest. It was perfect for the little blossoming tree I have on my piano. (More on that later.)


I'll be back soon with more birds, nests, and eggs as I continue sharing my spring decor.

Until then,

Megan

I linked up at:


Join  us Saturdays at tatertotsandjello.com for the weekend wrap 
 up           party!


UndertheTableandDreaming